Are expensive light switches worth it? Sockets and switches compared
16 June 2026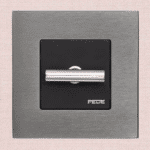
Brushed chrome sockets: a complete buying guide
18 June 2026Before any electrical planning begins, the substrate requires close attention. Solid brass plates, at a minimum thickness of 0.080 inches, provide the rigidity and tactile weight associated with refined electrical switches, while porcelain, tempered glass and acrylic each introduce distinct fixing demands that should be addressed at specification stage.
Beyond this, the backbox and wall construction must be judged with equal care. A substantial switch plate in solid brass can weigh between 400 and 600 grams per gang, which means hollow partitions often need reinforcement to preserve alignment, safety and long-term stability.

Pre-installation essentials and regulatory height standards
Safety checks before fitting a luxury switch
Every luxury switch installation must begin with the circuit isolated at the breaker and live current confirmed absent before any wiring is touched.
Once power is off, the existing switch and its wiring deserve a full inspection: insulation condition, wire gauge compatibility, earthing provision and circuit capacity all need verification before a new mechanism is introduced. Visual refinement and technical discipline are inseparable, particularly where older installations may conceal brittle insulation or undersized conductors.
- Circuit isolation Disconnect power at the breaker and verify absence of live current with a non-contact voltage tester before touching any wiring.
- Wiring condition assessment Inspect insulation for cracks or brittleness; confirm wire gauge is compatible with the new switch mechanism and that circuit capacity is sufficient.
- Colour coding compliance Follow standard conventions: black or red wires carry live current, white wires serve as neutral, and green or bare copper wires provide earthing.
- Personal safety equipment Use insulated gloves, safety goggles, and correctly maintained tools throughout the entire installation process without exception.
Correct switch heights under building regulations
In domestic properties across the United Kingdom, switch placement height is governed by Building Regulations Part M. The permitted range is between 750mm and 1200mm above finished floor level: a measure intended to support both safety and convenience.
Public buildings follow a narrower standard. There, switch height should fall between 900mm and 1100mm, broadly in line with door handle level, so that operation feels immediate and legible when entering a darkened space.
Within the domestic range, there is useful flexibility. A switch placement height of roughly 1050mm to 1200mm tends to correspond to elbow height for most adults, making it the placement height that balances instinctive reach with clean visual alignment in a single decision.
Why modern height standards differ from older installations
Those dimensions mark a clear departure from earlier conventions. Historical installations often placed switches at 1400mm to 1600mm above floor level, whereas modern standards lower them principally to improve accessibility for wheelchair users and children.
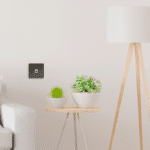
In practice, the change also serves contemporary interiors. Lower switch placement integrates more naturally with the room’s visual horizon, especially when the switch plate is intended to contribute to the decorative scheme, as is often the case in projects specified around FEDE Switch & Light’s brass finishes and crafted detailing.
Beyond this, the guide to luxury brass switches explains how plate proportion and mechanism type influence positioning, while luxury switch materials outlines the mounting implications of each finish.
Room-by-room placement strategy for luxury switches
Each room brings its own patterns of movement, lighting needs, and daily habits, distinctions that make room-specific switch placement a question of spatial logic as much as electrical compliance.
Optimal switch positions for bedrooms and living rooms
That principle begins with how a room is entered and used. In bedrooms, two-way switch positioning should be treated as standard: one control at the door, another beside the bed, so lighting can be operated without crossing the room after retiring.
In contrast, living rooms present fewer variables. Where there is a single point of entry, one switch by the door is usually sufficient, although a dimmer switch is often the right choice when a space is expected to shift from daytime use to evening atmosphere.
- Door entry switch: Place the primary switch just inside the door frame, on the latch side, at the established switch height for immediate access on entry.
- Bedside secondary switch: Install a second control at bedside level, typically 800–900mm in a bedside table setting, to complete the two-way switch positioning and allow operation from both locations.
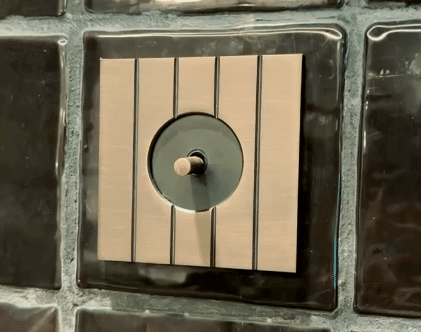
- Dimmer integration: Specify a rotary or touch dimmer switch in living rooms and principal bedrooms where scene-setting matters as much as basic functionality.
Once selected, the exact position should still respond to furniture layout. A switch plate hidden by an open door or blocked by a wardrobe quickly loses its purpose, however refined the material or mechanism may be.
Hallways, landings, and multi-door through rooms
The same logic extends into circulation spaces. Hallways and landings depend on two-way switch positioning, with controls at each end of a corridor and at both the top and bottom of a staircase, while larger properties often require intermediate switching from three or more points.
In practice, switch placement works best when it follows the path of movement rather than the nearest available wall. Hall and landing controls should sit within the entrance zone, where the hand expects to find them before darkness is crossed rather than after.
Bathroom and wet room placement requirements
That spatial logic changes in bathrooms. Regulations do not allow a standard switch within areas affected by splashes or vapour, so the control must usually be placed outside the room or provided as a ceiling-mounted pull-cord clear of the relevant zones.
- External door switch: Mount a standard switch on the corridor side of the bathroom door, aligned with the property’s general switch height.
- Ceiling pull-cord: Use an IP-rated pull-cord where external switch placement is architecturally impractical, provided that the rating meets the zone requirement.
- Shaving socket exception: Shaver supply units with isolating transformers are permitted, but must still be positioned in accordance with bathroom zones.
- Finish continuity: External bathroom controls should match adjacent switch plate designs and electrical outlets to maintain visual continuity across the threshold.
Worth specifying here: the finish determines long-term performance in moisture-adjacent settings. Polished chrome and vitreous glass are technically sound choices because they resist condensation and cleaning agents well, whereas unlacquered brass is better kept away from sustained humidity unless protected.
Beyond this, FEDE Switch & Light addresses continuity at the level of craft as much as specification. The luxury switch design in the SIENA collection supports a unified language across switch plate details, lighting controls, and electrical outlets, reflecting the Spanish manufacturer’s balance of artisan heritage and contemporary interior design.
Selecting finishes and materials for luxury switch plates
Material and finish selection sets the long-term character of every switch plate within a scheme. It reaches beyond appearance: corrosion resistance, patina development, tactile presence, and the way hardware sits within the wider architectural palette are all shaped here.

Solid brass versus plated alternatives for longevity
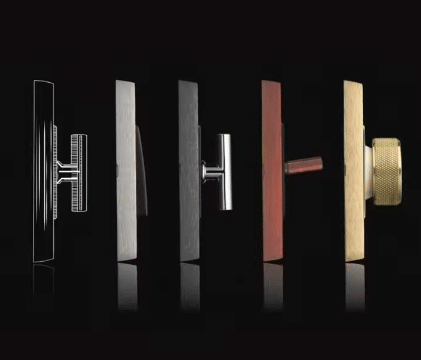
At the heart of luxury switch material selection, the distinction lies in the substrate itself. FEDE Switch & Light offers twelve brass switch finishes, all produced from solid brass rather than plated base metals: polished brass, brushed brass, satin brass, antique brass, antique copper, black nickel, brushed chrome, polished chrome, white metal, matte black, paintable primed styles, and bespoke options matched to the RAL chart.
That difference matters over time. Solid brass can be refinished when lacquer ages, while plated alternatives wear through irreversibly and expose lower-grade metal at corners and edges, precisely where daily contact is greatest.
Matching finish to room architecture and metal palette
Once the base material is settled, the finish determines how convincingly the hardware belongs in the room. Every visible element should be considered together: fixtures, taps, cabinet ironmongery, electrical outlets, dimmer plates, and socket frames. Where these surfaces diverge without purpose, the result feels improvised rather than resolved.
Polished or brushed solid brass is the right choice when specifying against cut marble. In contrast, milled graphite or bright nickel sits more comfortably in stark monochrome interiors, where warmth can introduce visual friction. Antique brass remains particularly persuasive in heritage renovations, while satin brass, protected by lacquer, suits restrained contemporary spaces that call for consistency through repeated use.
| Finish | Ideal context | Patina behaviour | Fingerprint resistance |
| Polished brass | Classical, formal reception rooms | Develops warm darkening over time (unlacquered) | Low, shows contact clearly |
| Brushed brass | Modern and contemporary interiors | Softens slightly; resists tarnishing | High, linear texture conceals marks |
| Satin brass | Minimalist and neutral spaces | Stable; lacquered to halt oxidation | Moderate, understated sheen reduces visibility |
| Antique brass | Period renovations and listed properties | Deepens to darker brown within three months | Moderate, hand-aged texture absorbs marks |
| Matte black | Industrial, monochrome, or contemporary schemes | Stable; no patina development | High, flat surface conceals fingerprints |
| Polished chrome | Bathrooms, wet rooms, modern kitchens | No patina; maintains factory appearance | Low, reflective surface shows contact |
Patina development and long-term finish maintenance
Unlacquered surfaces develop a protective oxidation layer that reads as patina, not damage, and confirms the honesty of the material. Solid brass also accepts refinishing evenly because its grain structure allows the surface to be restored without undermining the original character.
In practice, maintenance is straightforward: a soft, dry cloth used monthly is sufficient, while harsh chemicals should be avoided on both lacquered and unlacquered surfaces. Beyond this, any sign of irregular operation, flickering or resistance in the mechanism, warrants prompt attention to preserve both safety and the longevity of a precision-made component designed for decades of daily use.
Step-by-step fitting technique and mechanism quality checks
Precise installation determines whether a premium switch plate performs as intended or develops the rattle, misalignment, and inconsistency more often associated with lower-grade hardware. For solid brass electrical switches, each stage carries weight: wiring, seating within the electrical box, fastening, and final testing all shape the result.
Wiring connections and wall plate alignment procedure
The luxury switch fitting technique starts with careful wire preparation. Strip around 0.5 inches of insulation from each end, keeping the conductor clean and intact, then ensure each wire connects to the correct terminal: live to brass, neutral to silver, earth to the earthing screw.
Once connected, the mechanism should be seated squarely within the electrical box before any screw is fully tightened. The distinction lies in alignment: the switch plate must sit level, parallel to the wall surface, and close cleanly without visible gaps.
- Level verification Check that the switch plate sits level within the electrical box with a spirit level before fixing the final position.
- Screw fastening Tighten fixing screws evenly and with controlled pressure; excessive force can crack premium faceplates, especially porcelain or glass.
Beyond this, smart switches with Bluetooth control or integrated USB sockets need additional clearance and circuit compatibility. Worth specifying here: backbox depth must accommodate the module before the installation is closed.
Testing tactile quality and actuation consistency
Once the switch is selected and fitted, mechanism quality is confirmed through the feel of operation. A dimmer switch should move through its range smoothly, without pulsing, dragging, or hum.
- Edge-to-centre uniformity Test the rocker or toggle at the centre and both edges; resistance should remain even throughout.
- Click definition The actuation point should feel clear and consistent, with no rattle, softness, or brittle snap.
- Dimmer range test Confirm that output steps evenly from minimum to maximum without flicker at either end of the range.
In practice, the rocker or toggle should sit flush within the switch plate with no lateral movement. Any play after fitting points to a dimensional mismatch or insufficient fastening, both of which diminish the tactile precision expected in a high-end specification.
FEDE Switch & Light engineers the SIENA collection to this specification: Spanish artisan manufacturing, dimensionally consistent mechanisms, and faceplates machined to seat without play.
Post-installation testing and ongoing maintenance
With the plate secured and the electrical box closed, power may be restored at the breaker for final checks.
Provided that installation has been completed correctly, maintenance remains straightforward. Inspect periodically for wear, corrosion, or looseness, and clean the switch plate only with a soft dry cloth, since chemical cleaners can damage both lacquered and unlacquered brass finishes and compromise safety over time.
Frequently asked questions
Where is the best place to position a light switch when replacing an existing switch?
When planning to replace light switches, the existing switch should first be checked against current Building Regulations Part M: 750mm to 1200mm above finished floor level in domestic settings. In older properties, where an existing switch is often set at 1400mm or higher, moving it to elbow height, around 1050mm to 1200mm, improves accessibility and brings the new plate into a calmer visual line within the room.
Once that height is established, furniture layout matters just as much: the switch should remain easy to reach and unobstructed by cabinetry or doors. In practice, alignment with door openings and circulation routes gives the installation a more resolved relationship with the room.
Can a standard switch location be adapted to accommodate a smart switch or dimmer mechanism?
In most cases, a standard switch location can be adapted. The distinction lies in the depth of the electrical box: smart switches with Bluetooth control or integrated USB functions often require more space than a conventional mechanism.
Before the existing switch is removed, the module depth and circuit compatibility should be verified, and a qualified electrician should confirm wiring condition and capacity. Worth specifying here: some retrofits also require a deeper back box to house the mechanism neatly and safely.
How should switch plates be coordinated across a multi-room property to achieve a coherent result?
Once placement has been resolved, consistency begins with height: using the same level throughout the property gives electrical planning a deliberate character, rather than the fragmented look that comes from placing controls room by room. This approach suits both contemporary schemes and period interiors, provided that the proportions remain appropriate to the architecture.
Beyond this, the finish determines the overall coherence: brushed brass across a contemporary interior, antique brass within a period renovation. Outlets, socket frames, and dimmer fascias should follow the same material logic without exception.
Once selected, the finish should carry across the full specification. FEDE Switch & Light offers fourteen surface treatments alongside custom RAL options, accommodating the full finish spectrum of complex residential projects.